Cut It Out! Grab Objects In Images
- Chris Taylor

- Jan 18, 2023
- 3 min read
Updated: Sep 1, 2023
This tutorial describes how to cut out an object using photo editing software GNU Image Manipulation (GIMP) for later use.
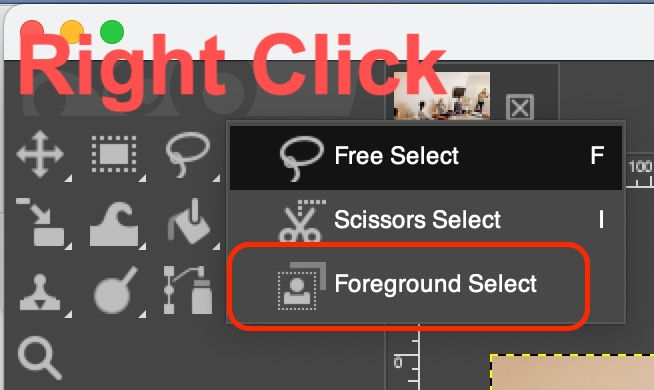
Use Foreground Select Tool
Open the image in GIMP. Choose the 'Foreground Select' tool.
Zoom into the object. I prefer the menu at the bottom because the Zoom tool magnifying glass changes what you are currently doing. Scroll to where the object is.
Trace roughly around the object. Depending on how far you zoomed in, you may need to scroll as you trace. Press Enter or on the 'Select' button.

Draw squiggly lines using Foreground Select to indicate where the object is. The more variation there is within the object and the more similarity with the background, the more lines needed. Don't worry too much if you don't get it right the first time, we can adjust it. If you make mistakes, you can use Undo (Edit menu) or the 'Draw unknown' Draw Mode.
You can play around with the stroke width. I prefer to have 'Feather edges' turned off.
Change the Preview Mode colour to a highly contrasting colour - in this case lime green.


Press Enter to preview. If there are large erroneous omissions or inclusions, keep adding lines. In the case of erroneous inclusions, change the Draw Mode to 'Draw background'. Use this to mark holes (e.g. under my armpit) as background as well.
Consider zooming in more with that Zoom drop down menu at the bottom left.

When you are happy that what is not shaded green (or the colour you chose) is what you want and what is shaded green is what you don't want, you can press Enter or the Select button.
And whoops, I selected so some of that beach sand is part of my head. Not to fear - we can still make corrections. GIMP is very forgiving.
Free Select Tool
Choose the Free Select tool.

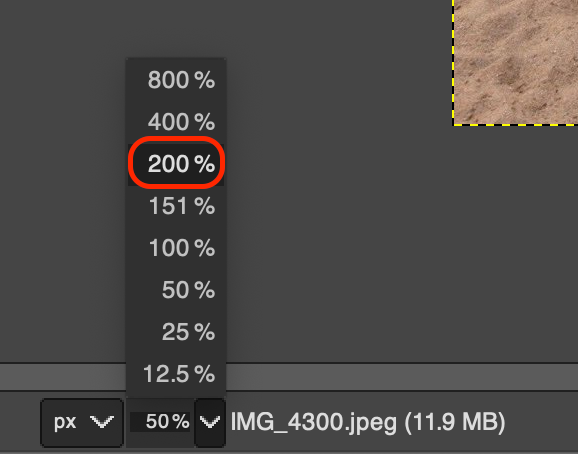
If you want to add to the selection, hold down the Shift key before clicking. If you want to remove from the selection, hold down the Command key on a Mac, Control key on a PC. Consider zooming in even further, below I used 1 in 800. Click once to add a point, click and hold to trace freehand. If you release the mouse button, it is probably worth avoiding the orange dot because dragging on that will move the whole line you traced (reversible, but annoying). Press Enter when done for each shape.
If you make a mistake, choose Undo from the Edit menu and it will revert to the previous selection. Very handy and used frequently by me - e.g. I let go of the Shift key too early.

Copy to a New Layer
When you are happy with the selection, you can copy to a new layer. Choose Copy from the Edit menu...

...and choose Edit -> Paste as -> New Layer. You can rename it by double clicking on the layer name.
At this point it is probably worth saving all that work. Because we have now actually done something (copy to a separate layer), we can. Save the GIMP native XCF file somewhere safe to reuse and edit later easily.
Make sure it looks right. If not, we can still make even more corrections.
Final Touch Ups
Start by turning off the base layer.

GIMP will only edit what you have selected on the active layer. Memorise this or lose hair! The layer with the white border is the active layer. Go to the Select menu and choose All so we can edit anything on the active layer.
Eraser
Removing is easy - use the Eraser.

Choose the size and shape you want. You can even make blurred edges but in this case, we're more likely to use the hard edge circle.


Patch Up with Copy and Paste
Adding back is a bit trickier, but still reasonably easy. Make the base layer active and show it again.

Choose the Free Select tool and trace the bit you want.


Choose the Edit menu and Copy.
Make the pasted layer active and hide the base layer.

Choose Edit menu -> Paste. Press on the green anchor in the bottom right or click where you are pasting it.

Save Your Work
Now all is well! Well done, you now have a useable object to place anywhere and anyhow you like. (And yes, please ask me for permission before using the one below in your images! 😁) Save the XCF file.


Comments