Transform Your Home by Laying a Hybrid Floor - A Step by Step Guide
- Chris Taylor
- Dec 17, 2023
- 5 min read
Got some shoddy (almost literally) carpet or some other flooring you want to replace? Or building a home? Consider hybrid flooring. It's relatively inexpensive, easy to lay and arguably looks better than lino (certainly 90's lino anyway).
With hybrid flooring, the hardest part is getting started. You will need to know the plank dimensions and the detailed dimensions of the floor you are laying on. In particular, the planks will specify a minimum cut width and cut length - these should be adhered to, or you will end up with fragile pieces that are difficult to cut and lay without breaking them.
You will need:
Hybrid flooring
Pencil
Set square
Ruler
Measuring tape
Crosscut saw (more accurate) and/or a circular saw (faster)
When ordering the flooring (if you need to order it), give the exact dimensions or maybe a bit over to the flooring specialist. If you are buying from Bunnings without the need to order in, you can calculate the area yourself as
Length x Width
For each rectangle. Subtract 'holes' with the same formula. There will be wastage, simply buy or order another box of flooring panels if and when you need it. If planning is critical, work out in detail how many planks you need, taking into account wastage (beyond the scope of this post). Or just ask the flooring specialist, they may have access to a computer program able to work it out easily.
Removing Old Carpet
We had carpet that was falling apart and very unsightly - in fact, to be honest, we were embarrassed to let visitors in. A pet dog had started ripping some of it up, my cat continued ripping it up in bits and vomiting on it and it had also been vomited on at a party. It can be very difficult to clean - believe me, I've tried.


Pulling it up is quite easy, but brace yourself for the sand and dust!
I would recommend vacuuming the carpet, underlay and bare concrete or timber to avoid spreading sand and dust everywhere.
To vacuum the underlay, use the brush head and pull it up vertically a few cm as you vacuum. This avoids the brush head 'gripping' to the underlay and tripping over itself.
The trickier part is removing the nail plates. I found the easiest way was to drive in a flathead screwdriver with a hammer - first right at each nail, then just next to the nail. In most cases the nail popped out of the concrete. Where it doesn't, use a claw hammer. If there is one left in a concealed corner, you may need to use an angle grinder. Those nail plates are sharp, so removing them promptly is highly recommended.
Working Out the First Plank
As I said earlier, this is the hardest part - it's all downhill from here!
Decide which direction you want the planks to run.

Work out how wide the planks will be along all edges parallel to the planks. This may take trial and error. I would suggest using Excel and the MOD function to calculate the remainder - i.e. the 'leftover width'. Ideally, you don't want the cut planks to be narrower than about 30 mm, certainly check the specifications for the planks. Check the specifications to see what space you need to allow between the flooring and walls, windows etc - for ours it was 10 mm.
If the 'leftover width' is narrower than this, make the two end widths greater than half the full width.
As an example, we had four edges parallel to the plank rows as shown in the image.
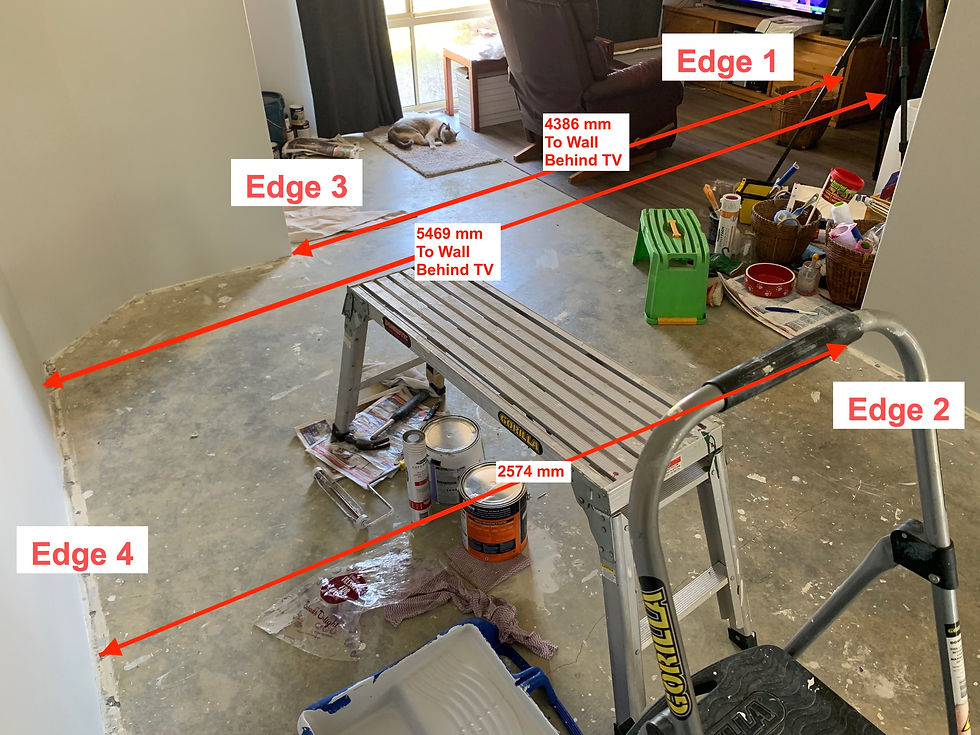
In our case,
Plank width = 180 mm
Gap between flooring and wall or other vertical surface = 10 mm
Edge 1 to Edge 3 leftover = (4386 - 20) modulo 180 = 4366 modulo 180 = 46 mm
Edge 1 to Edge 2 leftover = (5469 - 2574) modulo 180 = 15 mm
Edge 1 to Edge 4 leftover = (5469 - 20) modulo 180 = 49 mm
This means we would have a 46 mm wide strip at Edge 3, a (180 - 15) = 165 mm wide strip at Edge 2 and a 49 mm wide strip at Edge 4 if we simply plane the tongue off the edge of the first row. We decided not to do this.
We went for a 110 mm wide row at Edge 1. So,
Edge 3 row width = 180 + 46 - 110 = 116 mm
Edge 2 row width = 15 + 110 = 125 mm
Edge 4 row width = 180 + 49 - 110 = 119 mm
This will look much better, as they will all be about the same width.
The planks are arranged into rows and this cannot be altered, i.e. offsetting within a row won't work. Also, the planks can normally only be layed in one direction, typically left to right when facing the start row. The joins within a row can change by altering the length of the first and last plank in each row. The length of the last plank is then dictated by the length of the first plank and the width of the room (and the standard length of one plank).

I have subsequently been told staggering all the intra-row joins looks best, but being OCD I decided to make every second join line up (the specifications will say that adjacent rows cannot have joints that line up and in our case, no closer than 300 mm). To do that, I worked out how to get a full plank length then half a plank length alternating at the window. The window recess was 90 mm. So I worked out:
Full plank length = 1840 mm
Window recess = 90 mm
First row will be a half length row and at a wall
Therefore the very first plank would be 1840/2 - 90 = 920 - 90 = 830 mm long
And the first plank on the second row would be 1840 - 90 = 1750 mm long
Therefore the first plank needs to be cut to 1750 mm long by 110 mm wide.
Whew! 😅
Actually Laying the Planks
Now we worked out the first and second rows, it's easier. First and foremost, refer to the manufacturer's specifications. We used Dunlop 7 mm planks.
Keep the floor vacuumed and clear where you are laying.
Tape 2 spacers together to match the gap required. I made about six of these.
I would recommend a circular saw for cutting longitudinally and a crosscut saw for cutting across. Mark the dimensions on the first plank and cut across first, along second.
Insert the tongue into the groove according to the specification as you lay. Use the spacers to maintain the gap with the wall, window or other surface.
For the last plank in a row, rotate the plank 180 degrees in plan, place a spacer against the wall and mark with a pencil where it overlaps the plank previously laid. Cut across here.
For second and subsequent rows, lift at the angle required by the specification and slot in. You may need help to make sure it slots in properly.
Use a hammer and spreader to make sure it fits together tightly, with absolutely no gap.
If you are laying the floor in stages like Dad and I, lay a previously longitudinally cut spare length to protect the tongue and groove.
Finally, fix the skotia or skirting to the wall to cover over the gap.
Enjoy your new floor! 😃
Comments